Showing posts with label Ruza Rebel. Show all posts

Tuesday, October 29, 2013

Halloween Treat Bags ...

Good morning! Ruza here to share another batch of Halloween Treat Bags using the Best Witches stamp set.

First, I wanted to share that in our neighborhood we always have Trick-or-Treating the Sunday before Halloween so that the kids can trick-or-treat during the daytime hours. No evening doorbells being run here. Thankfully! That being said, even though we had like 200 kids come by I still have a TON of candy! So I decided to make NEW Treat Bags for my daughter's classroom - 9 in all!


I started with these bag I bought years ago at Hobby Lobby, which I just found this weekend, and filled them up with candy. I like these because they have a zip-lock at the top for closing. I added a line of 1/4" tape to the bag above the zip-lock on the back. This allowed me to line up the bag inside the Clean & Simple (CAS) topper I created.


I pulled out some Black and Orange cardstock, cut to size and scored each piece. Next step was to stamp the sentiment, and the fun black cat and bat, from the Best Witches stamp set with Memento Tuxedo Black Ink. After folding the cardstock and placing the bag, I used my Tim Holtz Tiny Attacher to secure the treat bag.

Here is a picture of all 9-bags together ...


I also made 4-more bags for my daughter's teacher and the teacher's aides in her class.

This super cute set is available in the storeand is perfectly perfect for all of your Halloween projects!

At this time I want to say a BIG Thank You to Anne for inviting me to join her Design Team here for Stamp Annie*Thing. It has truly been a pleasure working with her stamps and sharing my designs with all of you over past the 8-months.

Wishing you all the best, and I hope to continue to see you around blog-land!

Ruza

Wednesday, October 23, 2013

Halloween Treat Box ...

Good morning! Ruza here to share a Halloween Treat Box using one of the many images available in the Best Witches stamp set.


I don't have a cutting machine so when I saw this cute Mini Take Out Box Die it went in my cart.  After cutting out the die with my Cuttlebug, I stamped the cat with Memento Tuxedo Black ink on each panel of the box, added Distress Ink, and then used Scor-Tape to put the box together. The last step was to add the Charcoal Twine for the handle. Super easy!

Until next time ... Enjoy!

Ruza

Tuesday, October 15, 2013

VooDoo Dolls Family ...

Good morning! While thinking about today's post an idea popped in my head featuring the adorable VooDoo Dolls stamp set. This is my first time creating with these adorable Dolls, and it was truly a lot of FUN!


My idea was to create a dysfunctional family with these adorable VooDoo Dolls. Truly reminds me of all the "Craziness" that has happened in the family I grew up in. If I wanted to be true to that I would have had to make a much bigger card so that it would hold 9 VooDoo Dolls. Seriously, 9 ... I'm the 2nd to the youngest. So "Craziness" was the norm in our house.

Back to my card! Each of the VooDoo Dolls were stamped with Memento Tuxedo Black ink a couple of times. Once on the cardbase, and then extra copies for coloring. They were colored with Copic Markers, cut out and layered over the design on my cardbase. The final step was to add the sentiments along with the buttons in each corner.

This adorable set is available in the store that can be used for many different occasions!

Until next time ... Enjoy!

Ruza

Tuesday, October 8, 2013

Halloween Treat Bags ...

Good morning! Ruza here to share a few Halloween Treat Bags using the Best Witches stamp set.


With Halloween fast approaching it's time for me to make Halloween Treat Bags for my daughter and her classmates. I found some Medium Glassine Bags in one of my craft cabinets that I forgot about. Combine the Glassine Bag with cardstock, washi tape, ink, enamel dots, and the cool black cat and sentiment in the Best Witches stamp set and you have everything you need to make some cute treat bags.

How about a closer look at each bag ...


This super cute set is available in the storeand is perfectly perfect for all of your Halloween projects!

Until next time ... Enjoy!

Ruza

Tuesday, October 1, 2013

Have a Bewitching Day ...

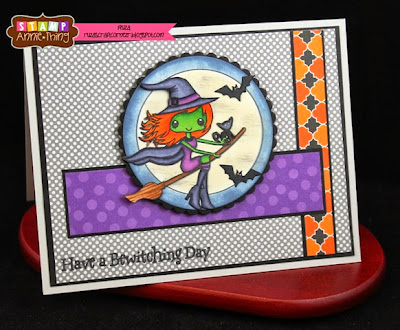
Good morning! Ruza here to share a Halloween card featuring the adorable Best Witches stamp set.


This beauty is called Wendy, and she is flying thru the sky with her friends ... her black cat and the bats! Wendy and her friends were colored with Copic Markers and cut out. I then stamped the image again, cut it out with a Nestabilities Circle Die, and using a dauber I colored the moon with A Muse Lemon Whip ink and the surrounding circle with Tim Holtz Stormy Sky Distress Ink. Once this was dry, I paper-pieced Wendy and her friends on the stamped image. After going thru all of my Halloween DP I settled with the Haunted Manor DP by Doodlebug Design.

This super cute set is available in the store, and is perfectly perfect for Halloween!

Until next time ... Enjoy!

Ruza

Tuesday, September 17, 2013

Love you every day ...

Good morning! Ruza here to share my card featuring the adorable Lulu's Valentines stamp set.


For today's card I colored her skin and hair with Copic Markers, then pulled out my scrap design paper to paper-piece her outfit and string of hearts. Distress Ink was added around the edges, pearls were added to her hair, and 3D Foam Squares were used to layer my CAS design onto my cardstock.

I hope today's project inspires you to head on over to the store to check out all of the amazing stamps that we have to offer.

Until next time ... Enjoy!

Ruza

Tuesday, September 10, 2013

Let down your hair ...

Good morning. Ruza here to share a fun card I created with the adorable Mermaids stamp set.

Size: 3-1/2" x 5"

The Mermaids are so much fun to color! For today's card I pulled out my scrap design paper, and a strip of cardstock that I cut with my border die. After putting the background together I used 3D foam squares in the center of the wave die to pop it up so that the adorable little Mermaid could be popped up under the waves.

Mark your Calendars for the September Mini-Stamp Release.
It starts this Thursday, September 12th!


I hope today's project inspires you to head on over to the store to check out all of the amazing stamps that we have to offer.

Until next time ... Enjoy!

Ruza

Tuesday, September 3, 2013

Fall Theme Notecards ...

Good morning. Ruza here to share a couple of Fall Themed Notecards that I designed for my daughter's new teacher. She loves Halloween and all things Fall, so I know she will love these 5" x 3-1/2" Notecards I designed with her in mind.


The pair of pumpkins from the Our Lil' Pumpkinhead and sentiments from the One Cool Cat stamp set were just what I needed to make the Notecards. 

I first stamped the pumpkins and sentiment on the cardstock, then used a Black Multi-Liner and ruler to draw the lines. Copic Markers were used to color the pumpkins, and once the cardstock was added to the card-base I added black rhinestones to the empty corners. Super easy!

I then stamped the Pumpkins on the envelopes and colored them in with my Copic Markers. Now that the holiday weekend is over, I will create the rest of the Notecards ... there will be 4 of each design in the set.

I hope today's project inspires you to head on over to the store to check out all of the amazing stamps that we have to offer.

Until next time ... Enjoy!

Ruza

Tuesday, August 27, 2013

How tweet of you ...

Good morning. Ruza here to share a Clean & Simple (CAS) card with you today.


As I was going thru my stamps I noticed this adorable potted plant in the For Peeps Sake, and just had to make a card for the Clean & Simple Sketch #254. After coloring the potted plant with my Copic Markers, I cut out the circles, distressed the edges, and layered it on my design. I pulled out the sentiment from the Rare Bird stamp set, and added some gems to the edges.

The For Peeps Sake stamp set has so many different images that can be used year round. I hope today's project inspires you to head on over to the store to check out all of the amazing stamps that we have to offer.

Until next time ... Enjoy!

Ruza

Tuesday, August 20, 2013

Teacher's Gift ...

Good morning. Ruza here to share a Teacher Gift idea ...


I created my own DP using the Rose from the Party in the USA stamp set, and coloring them with my Copic Markers. The "Thank You" sentiment is part of the One Cool Cat stamp set.

Here are several more photo's showing the Gift opened up ...


I did not design this Post-it-Note Holder myself, I saw this awesome Tutorial last week over on the MFT Blog, and just had to try my hand at it. Since I am in the process of making Teacher Gifts for an upcoming Craft Fair that benefits the Special Needs Students in my community I thought this would be an awesome addition to the products I'll be offering.

I hope today's project inspires you to head on over to store to check out all of the amazing stamps that we have to offer.

Until next time ... Enjoy!

Ruza

Tuesday, August 13, 2013

Have a Happy Birthday ...

Good morning. Ruza here to share another Clean & Simple (CAS) card with you this week.

Size: 3-1/2" x 5"

When I saw the Clean & Simple Sketch #253 over the weekend, I knew it was perfect for a sweet Birthday card. So I pulled out the FUN Wish Big stamp set to create my card. I tend to cut my photopolymer stamps to use only a portion of the stamps when the desire hits, and that is what I did for this card. The small present is part of the Wish Big sentiment stamp in the set, and since I wanted to use both present images I cut the sentiment out. It fit perfectly back together when I was done. I also separated the sentiment so I could place it on 2-lines.

The images were stamped with Memento Tuxedo Black Ink, and colored with my Copic Markers. Once I layered the pieces onto my card base I used a White Gelly Roll Pen to add white dots to the big presents and to the ribbon on the small presents, placed the sentiment in the corner, and then I added tiny gemstone to the bow.

The Wish Big stamp set has so many images and sentiments that are perfect for creating CAS cards. I hope today's project inspires you to head on over to store to check out all of the amazing stamps that we have to offer.

Until next time ... Enjoy!

Ruza

Tuesday, August 6, 2013

Good morning. Ruza here to share a Clean & Simple (CAS) card with you today.

Size: 3-1/2" x 5"

I pulled out the lovely Rare Bird stamp set for today's card. After stamping the birdhouse on Neenah Solar White cardstock, I colored the image with my Copic Markers, and then cut it out to paper-piece on the actual card. The sentiment in the set is perfect for thank you cards, and I know with school starting in 2-weeks I will be needing many of these. After adding the sentiment, I used a 0.3 Black Copic Multi-Liner and ruler to add the faux stitching around the card, and then stamped the birdhouse on the envelope.

This is one card that I plan on reproducing using different cardstock for the background.

The Rare Bird stamp set has so many images and sentiments that are perfect for creating CAS cards. I hope today's project inspires you to head on over to store to check out all of the amazing stamps that we have to offer.

Until next time ... Enjoy!

Ruza

Tuesday, July 30, 2013

Wish Big Journal Card ...

Good morning and Happy Tuesday! Today I'm sharing a Journal Card that I created for my 6x8 Snap Binder.


At one time I used to scrapbook using Creative Memories products, and that fell on the wayside as work and family life took precedence. I really want to finish scrapbooking our family photo's, and now that I'm a stay-at-home mom ... what better time to start. I've been eyeing all the new binder(s) available for scrapbooking, which is so much more up my alley that I finally gave in and purchased a 6x8 Snap Binder in pink. Instead of starting where I left off, I am going backwards starting with my daughter's 21st Birthday this year.

To get myself started I pulled out the NEW Wish Big stamp set to decorate a Journal card. I stamped the "Wish Big" sentiment, and the stand alone present several times on the card, and then again on white cardstock. A Colored Clear Star Pen was used on the open spaces of the sentiment on the card, and after coloring the extra's with Copic Markers I paper-pieced the candles and presents. Yellow Stickles was used on the candle flame. Final add was the "Party Time" sentiment.

Here is the final page put together. One down and many more to go.


I used some of my old Creative Memories stickers, and a Celebration Vellum Quote to finish the page. I hope you are inspired by today's project to head on over to Stamp Annie*Thing Store to check out all of the amazing stamps that we have to offer.

Until next time ... Enjoy!

Ruza

Tuesday, July 16, 2013

Hippity Hoppity ...

Good morning! Ruza here to share a card I submitted for publication that didn't get picked up. Now, I normally wouldn't be sharing an Easter card at this time of year, but my mojo is sorta missing. I've been struggling and didn't want to have you all go without today. So here goes ...


I absolutely love this bunny from the Bunny Hugs to You stamp set. You can either have a Girlie Bunny or a Masculine Bunny, and I obviously went Girlie with this one. I used the repetitive technique to create motion for her. The final image was colored with Copic Markers, and I paper-pieced the inside of the ears, the hair bow and her skirt.

Here's a look at the Bunny Hugs to You stamp set.


I hope you are inspired by today's project to head on over to Stamp Annie*Thing Store to check out all of the amazing stamps that we have to offer.

I'll see you on Monday, July 22nd, with a SUPER FUN post all about ... Hugs & Wishes.

Until next time ... Enjoy!

Ruza

Tuesday, July 9, 2013

Taco Night ...

Good morning! Ruza here to share an Invitation I made.


I made a "Taco Night" invitation using some of the stamps from the One Cool Hombre stamp set.  First step was to stamp and color the yummy food, and cut the pieces out. Next was the hard part. I made several mistakes while creating this frame with the border stamp, a ruler, and a thin black marker. So I pulled out my Crop-A-Dile to punch the holes where the circles are in the stamp, and a Fingertip Blade was used to cut out the rectangles in the design. Once the frame was complete, I layered it on the background and the cardbase, and then I added the yummy food in the center with the sentiment.

Here's a look at the One Cool Hombre stamp set.


I hope you are inspired by today's project to head on over to Stamp Annie*Thing Store to check out all of the amazing stamps that we have to offer.

Until next time ... Enjoy!

Ruza

Wednesday, July 3, 2013

Proud to be an American ...

Good morning! Ruza here a day later than normal, but I wanted to make sure that my Patriotic card was perfect to showcase Rose being so proud to be a part of the upcoming 4th of July Celebrations.


Rose is from the Party in the USA stamp set.  I colored Rose with my Copic Markers, cut here out and put her on the side. I decided to use an Operation Write Home Sketch (#178) since that is where my card will be going. Once a week OWH provides sketches for card makers to use for making cards that are sent to our troops.


I hope you are inspired by today's project to head on over to Stamp Annie*Thing Store to check out all of the amazing stamps that we have to offer.

If you would like more information about Operation Write Home click here to head on over to their blog.

Until next time ... Enjoy!

Ruza

Tuesday, June 25, 2013

Fun Starts Here ...

Good morning! Ruza here to share a Clean & Simple card using the Fun Starts Here stamp set.


When it came time to create my project for today, I remembered being inspired by the current Clean & Simple Sketch #246 that I saw over the weekend. So I pulled out all of my stamps and decided to use the Fun Starts Here!

To start off I stamped the sweet little girl with Memento Tuxedo Black Ink and colored her with my Copic Markers, and then I used a White Gelly Roll Pen to add the dots to her dress. I made a mask of the girl with a post-it note to cover her up while working with the sentiments. Before I stamped the sentiments I laid them out on my layout, and moved them around until I liked the line-up, that included cutting one of the sentiments. Leaving the sentiments on my layout I put a block on them, inked it up, and wallah the sentiments are perfectly aligned where I wanted them. I used 6 of the 8 sentiments that come in this adorable stamp set. Have a look!


I hope you are inspired by today's project to head on over to Stamp Annie*Thing Store to check out all of the amazing stamps we have to offer.

Until next time ... Enjoy!

Ruza

Tuesday, June 18, 2013

Wine & Bread ...

Good morning! Ruza here to share a card that I created using the awesome NEW Ooh La La stamp set.


I created the background with Chalk Pigment Ink and one of the elements available in the set.  I decided to use the wine bottle, wine glass, and the bread as the focal point of my card. The images were stamped with Memento Tuxedo Black Ink, colored, and layered on my design. Once done I used a Memory Box Jasmine Frame Die to frame my scene, and added some pearls to the flowers. Last step was to add Glossy Accents to the Wine Bottle & Glasses.

Here's a closer look at the scene I created ...


I don't want to leave the bottom section empty so I need to add a sentiment, but I'm just not sure which one to use ... there are so many to choose from. Bon Appetit, Bonjour, Merci, Voila ... it's so hard to choose.


I hope you are inspired by today's project to head on over to Stamp Annie*Thing Store to check out all of the amazing stamps we have to offer.

Until next time ... Enjoy!

Ruza

Tuesday, June 11, 2013

SAVE the Date ... June Release Blog Hop ...

Good morning! Ruza here to let you know about our NEW Release Blog Hop coming up this week ...


We have some amazing creations to share with you that feature the NEW Stamp Sets being Released on Thursday & Friday! I can't wait to share my creations, and hope you MARK your Calendar to come back and HOP with us!

Until next time ... have a marvelous week!

Ruza

Tuesday, June 4, 2013

You make me smile ...

Good morning! Ruza here to share an adorable card that I created using the awesome Here's the Dirt stamp set.


This little girl is so adorable, and so much FUN to create with! I colored her hair and skin, and the tree and dirt with my Copic Markers, and then paper-pieced her clothes with Design Paper.

I hope you are inspired by today's project to head on over to Stamp Annie*Thing Store to check out all of the amazing stamps we have to offer.

Mark your Calendars to come join us for our NEW Release Blog Hop Thursday, June 13th and Friday, June 14th.

For all the details on what inspired today's design, head on over to Ruza's Craft Corner.

Until next time ... Enjoy!

Ruza