Showing posts with label clear stamps. Show all posts

Wednesday, June 24, 2020

Sweet Summer Wishes

Hello Everyone! Today I am so excited to share with you a Summer themed card that I created for inspiration this week featuring some Amazing Stamps, Dies, and Stencils from Stamp Anniething.
For my card I am showcasing the Beautiful Mia- Fun at the Beach Limited Edition Clear Stamp Set,  and Coordinating Dies. I just Love how versatile the stamps, and dies from Stamp Anniething are, and how they can be used for so many different occasions and projects. Now here is what I created:

Products used from Stamp Anniething:
Copic Markers used:
Skin: E04, E11, E21, E00, E000, E0000
Hair: E35, E31, E51, Y00
Green: G17, YG11, YG00
White: C5, C3, C1
Pink: RV04, RV21, RV10, RV000

Distress and Distress Oxide Ink Pads used:
Background and Diecuts: Vintage Photo

Also don't forget to join in all the Stamp Anniething Stampers fun by adding your creations to the 

Thank you so much for stopping by! I hope that my project has inspired you to try out your own creations with these super Adorable stamps.

Hugs, Mindy

Wednesday, February 19, 2020

You're All Heart

Hello Everyone! Today I am so excited to share with you a Love themed card that I created for inspiration this week featuring some Amazing Stamps, Dies, and Stencils from Stamp Anniething.

 For my card I am showcasing the super Amazing Land Of Oz Bundle Theme Set. I just Love how versatile the stamps, and dies included in this set are, and how they can be used for so many different occasions and projects. Now here is what I created:

Products used from Stamp Anniething:
Copic Markers used:
Skin: E04, E11, E21, E00, E000, E0000
Hair: E35, E31, E51, Y00
Silver and White: C5, C3, C1
Pink: RV21, RV10, RV000

Distress and Distress Oxide Ink Pads used:
Background and Diecuts: Salty Ocean, Vintage Photo.


Also don't forget to join in all the Stamp Anniething Stampers fun by adding your creations to the 

Thank you so much for stopping by! I hope that my project has inspired you to try out your own creations with these super Adorable stamps.

Hugs, Mindy

Saturday, September 21, 2019

Holiday Sweater

Hello Everyone! Today I am excited to share with you a Holiday themed card that I created for inspiration this week featuring the Absolutely Gorgeous Lorraine- Ugly Sweater Clear Stamp from Stamp Anniething. I just Love how her super cute sweater can be colored in different color combinations to fit so many different Holiday cards and projects!

Products used:
Copic Markers used:
Skin: E04, E11, E21, E00, E000, E0000
Brown Hair: E37, E35, E31, E41
Red: R59, R35, R22, R20
White: C5, C3, C1
Blue: B06, B12, B00
Green: YG09, YG11, YG00, Y00
Pink: RV21, RV10, RV000

Distress and Distress Oxide Ink Pads used:
Background and Diecuts: Vintage Photo, Candied Apples.

Also don't forget to join in all the Stamp Anniething Stampers fun by adding your creations to the 

Thank you so much for stopping by! I hope that my project has inspired you to try out your own creations with these super Adorable stamps.

Hugs, Mindy

Monday, February 19, 2018

Make your own rainbow!

Hi Friends! 
Stephen from Stampin' Steve here today and its my day to share a card I created using a stamp set that every marker enthusiast needs to have...Samantha - Make your own rainbow!


I coloured her  using the following Copic markers

Copics:
Skin - E04, E11, E21, E00, E50, R20
Hair - E44, E43, E42, Y21
Dress - R89, R85, R83, BV04, BV01, BV00
Copic Marker - C4, C2, C0, 0, V09, V06

To finish off my card, I kept the layout super simple by adding rainbow striped pattern paper along the left hand side and accenting it with a small strip of purple card stock as well as doing some simple ink blending using using Wilted Violet Distress Ink.

I hope you enjoyed my latest card creation!
Until next time - Stephen 

Wednesday, December 20, 2017

Masking Tip

Hello there, it's Ellen here and this time I have a quick tip for you. In this post I want to show you how easy and fun it is to give a face to any shape you can think of. I used the  “Katy Im Smitten Kitten” stamp set. Below you see how this is made:


1. First you need to stamp the image on some masking tape. For people that don’t know; masking tape is paper with a sticky side. The glue is not permanent, so you can remove the paper easily. That’s also why crafters use it a lot for fun techniques.

2. Everything you want to be visible on your actual project you have to cut out the masking paper. On my wooden tag I wanted a face, so I cut out the face on the masking paper. After that I simply placed the masking paper on top of my wooden pine tree and stamped my stamp on top of it. I used a stamping tool for it so I was sure my face would be exactly stamped in the open ‘window’ I created on the masking paper.


If you stamp on wood like I did, it’s good to first do a check up to be sure the ink doesn’t bleed into the nerves of the wood.


I cannot wait to do this same thing on a heart or a star. What are your ideas with the masking technique?

Wednesday, September 27, 2017

Purr It's Almost Halloween

Hello everyone, it’s Ellen here with a blog post for you. With seeing so much scary projects on social media I had to make something for Halloween. On this post I would like to show you how you can turn a stamp set in a different theme.


For this card I used the cute "Brittney - Purr" stamp set. She is snuggling with a cat and at first sight it doesn’t looks like something for Halloween. Yet the cat fits perfect for that holliday. I colored the stamp with copic markers and tried to stick within the theme when I did choose my colors.  Adding dark blue and black as colors with distress ink for my background, immediately change the theme of the card too. The pumpkins (unfortunately not a SAT stamp) made it even more obvious.


Halloween is really something I love creating for, for sure if it’s a cute spooky. Did you found already a SAT stamp you can use for Halloween? Pleas let us know!

Wednesday, September 13, 2017

Especially For You

Hallo and welcome to our blog. It's Ellen here and are you ready to craft? Because I’m with the new Stamp Anniething blog challenge. As you know it’s all about Autumn and leaves.              


Of course you can choose if you go for leaves OR for a fall color combination; I choose to be inspired by both. The leave theme immediately let me think of  Molly with her beautiful sunflower. Than with the autumn flower I only had the need to make the colors to fit perfect for fall. The sentiment from our new "Holly Especially for You" stamp set fit’s perfect since it can be used for thanksgiving.


I hope you liked my card and you got inspired do make something with Autumn in your mind. I cannot wait to see your projects!


How to Play Along:
- Create a new project using leaves or autumn colors.
- Share your creation at Our Facebook Group HERE by October 3rd, 2017.
- Only one entry.
- A Stamp of your choice will be awarded to the winner, if we have five or more entries.

Wednesday, August 30, 2017

Splashy Hello

Hi there, it's Ellen here! Although summer is almost over, still it's good weather and so perfect to share a happy summer card with the "Audrina - Make a Splash". 


I thought brown an purple where the perfect colors for this cutie. Copic Markers helped me coloring this mermaid. For the pearls in her hair I used Nuvo glitter drops and glossy accents where used on her eyes. The extra shine really adds somehting special.


To mimic a bit of the water I used distress ink to make the background and an embossing plate with weird triangles. Of course a bow and the cute sentiment couldn't be missing too.


That was it already... Have a mermazing day!

Wednesday, August 16, 2017

Sheers With A Coconut Drink

Hi crafters, it's Ellen here. I am really excited to be sharing this new Stamp AnnieThing card. I was in love with this "Vanessa Coconut Drink" from the first time I saw her and really wanted to make a cute summer card with her.


With distress inks I created this beach scene and colored the Vanessa with copic markers. I would like to emphasize that it is very fun to decorate that hair band. I used some sequins and glued enamel dots in the middle of them. It gives the girl something extra cute, don't you think?


That was is already for today. See you soon with another card!

Wednesday, July 19, 2017

Stamping On A Box

Hello everyone, it's Ellen here. This is my first personal SAT blog post (woop woop), so here we go. Today I want to show you how to get a stamp from one side to the other side of a box. For this project you need a misti tool or something like that and of course a StampAnniething Stamp. I'm useing Violet Sweet As Can Be.


1. First stamp your stamp and remember to cover all fold lines with post it notes.
2. Then put your transparency on the exact spot of your stamp (I'm talking about the transparency from the stamp packaging with the print on) and use the magnet to put it down.
3. After step two we put the post it notes on the transparency, again where the image stops/fold lines are. After that you can also put everything aside.


4. Turn your box on the side you want the image go further. Put the transparency with the post it notes on it. Match the post it notes perfectly with the sides of your box.
5. Match your stamp with the transparency and place it on the "top flap" of your Misti tool.
6. Take the transparency away and stamp on.

This is how it looks when you put the box together.


Of course the box also needs a perfect sentiment.


I really like the final result. Hopefully you thought it was interesting to read. See you at the next release!

Monday, April 15, 2013

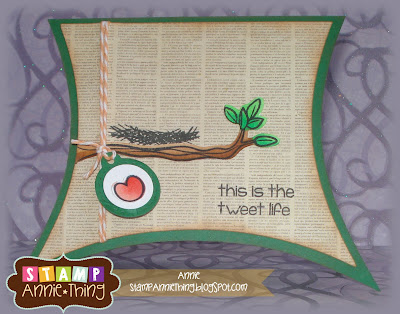
This is the Tweet Life

Good Morning everyone!  I sure do hope you had a pleasant weekend!
Today Im sharing with you a quick simple, carefree card I made.  I again have to apologize how dark the photos are coming, I live in the SUNSHINE State..but the SUN has not been out in days....nothing but dark dreary weather.  At least I know my summer photos will be much better once the sun starts to shine!

So, for my project today, I created a very SIMPLE saying card.  It utilizes three stamps off our Rare Bird Stamp Set.  One sentiment and 2 images.
I wanted to keep the card as simple as I could, and therefore used as little as possible.  
The Card base is a new file to be released later this week from SVG Cutting Files.
The twine is bakers twine 
and the stamps are all Stamp Anniething Rare Bird stamp set.
I also stamped the small heart image and placed it in a Jaded Blossom Candy Die (Candy Charms & Banner Die)

I Hope you enjoyed me super SIMPLE card this week.  See you next time around!!

Sunday, November 11, 2012

Grand Opening....

Its been a work in progress and I have SO MUCH more to do and want to accomplish.... we are starting off SLOW and will be adding more sets in over time...but we are HAPPY to Announce, we have SIX adorable Rubber Stamp sets available for purchase... stop by and check them out!